SINK Undermount LIFT KIT RESOURCES
What Equipment Do You Need for a Farmhouse Sink Installation?

The Sink
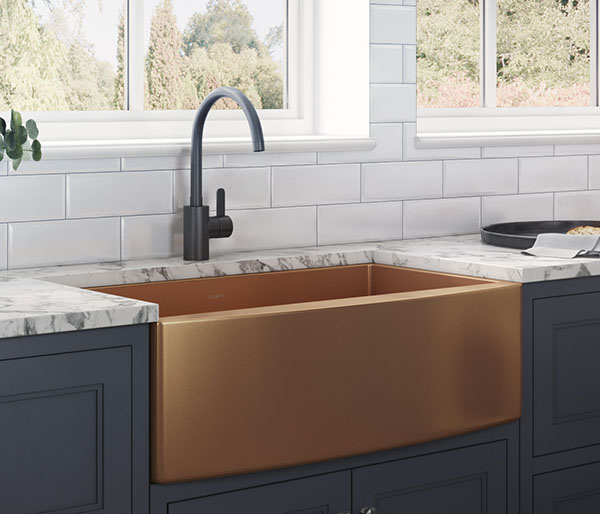
There are so many options when it comes to picking the perfect farmhouse sink. While the most common front-apron sinks can be stainless steel, porcelain or fireclay, there are certainly more eccentric options available.
For example, check out the matte bronze finish on this Ruvati sink.
Another big decision beyond material and color for your farmhouse sink is between single and double basin. If you or your client prefers to do a lot of washing and meal prep inside the sink, a single basin could be great. If multitasking between dishes and rinsing your greens a priority, then the double basin is likely a better fit.
Measure – then Measure Again
Unless your project kitchen is entirely custom, you’ll need to measure out the available cabinet space when considering your sink of choice. A surprise like that would be an unfortunate stop to your project – buy a sink that will fit the space.
Measure the height, width and depth of the available space for the new sink, then measure again. Once you’re sure about the exact dimensions you’re working with in your project, pick the perfect sink and get it shipped so that you can start with the next step.
Making Space
The next step for your installation project lies in cutting the countertops and the cabinet face with the appropriate tools. For both of these procedures, it’s important to wait for delivery and make the necessary cuts with the specific sink that you receive, as dimensions can vary slightly.
When cutting your counter tops to fit this brand new sink, it’s important to know the exact look you’re going for. It essentially comes down to two main looks, which are covered sink edges or uncovered sink edges.
The choice between a covered sink edge and an uncovered sink edge mostly comes down to what makes the most sense in your specific kitchen and personal preference. However, the most important factor in this decision is a seamless fit. There must be a slight overlap no matter the style so it can be sealed correctly without fear of leaks or pesky crumbs in everyday use.
As a side note for the cabinet face cuts with your jigsaw – install the sink before painting, so you can sand and paint any rough edges you encounter after installation.
The Best Sink Mount Bracket for Your Farmhouse Sink Installation
Regardless of whether you’re a cabinet manufacturer, home remodeling whiz, or simply wanting to improve your own home, ease of assembly is key. This why we created the DuraLedge sink mount bracket.
Its easy-to-follow with fast installation, it saves space, and is very adjustable, making it the clear choice for commercial or private sink installations, and the price doesn’t hurt either.
Made in the USA, this product makes what could be a difficult or technically challenging project into a safe, affordable, and most importantly efficient job.
The equipment required for the comprehensive DuraLedge HD installation method involves:
- Sink Manufacturer’s Specifications
- Safety Glasses
- Power Drill
- 5/16″ Wood Drill Bit
- #6 Phillips Bit
- 7/16″ Socket/Adjustable Wrench
- 1/4″ Socket or Flat Head Screw Driver
- Tape Measure
- Level
- Pencil
- Masking Tape (optional)
The equipment required for the comprehensive DuraLedge LT installation method involves:
- Sink Manufacturer’s Specifications
- Safety Glasses
- Power Drill
- 1/4″ Wood Drill Bit
- #2 Phillips Bit
- 3/8″ Socket/Adjustable Wrench
- 1/4″ Socket or Flat Head Screw Driver
- Tape Measure
- Level
- Pencil
- Masking Tape (optional)
Adjust DuraLedge Brackets
After your undermount sink brackets are safely installed, you can now adjust them to find the perfect fit for your sink. As shown in our HD installation guide, it’s an incredibly quick process to level your sink with their easy-to-use adjusting system.
Simply lower the sink into the cabinet by turning the adjustable post until you find that perfect fit, snugly fitting the hex nut onto the weld nut.
This is also the perfect time to test the way that water drains from your sink, especially in the large single basin style sinks. It may be necessary to provide the slightest tilt in DuraLedge’s adjustable brackets in order to allow the water to drain in the way the sink manufacturer intended.
The Perfect Seal
Whether you still have to lay the countertop over the edge of the sink or you’re going with the uncovered look, sealing the sink to the counter is of paramount importance. Once both the sink and counter are completely installed, it’s time to use a high quality silicone caulk to best prevent any sort of moisture damage or breakdown.
For kitchen purposes, it’s always best to use silicone sealant over a latex caulk, as it’s much more durable and significantly better at staving off any sort of water damage. Latex has a tendency to get brittle and crack when exposed to the amount of water a kitchen experiences, and is better off saved for other projects
Once your sink is sealed and watertight, you can move on to the last step – plumbing. Since you got the perfect dimensions early on, finalizing the plumbing and getting your sink functional should happen in no time at all.
Upgrade Your Kitchen Today
As mentioned earlier, I cannot stress enough how much easier DuraLedge’s adjustable brackets has made farmhouse sink installation. Beyond the optimal material quality, you’re saving a significant amount of time – and thus, money.
For any other questions about this game-changing installation method, or if you’re ready to install, get in contact with us for any and all of your farmhouse sink needs!